Anodize Tests - Reducing Variation
The standard for determining relative hardness/wear resistance of coatings in the metal finishing industry is the “Taber test” (i.e. Mil-A-8625 / AMS-Mil-A-8625 for Type III anodize). 1st Choice Consulting (formerly AnaCon Labs Inc.) investigated variances in Taber test results and addressed this topic at the 2007 Metal Finishers Conference. The following excerpts are based on a paper authored by Mr. Bruce Klinger of 1st Choice Consulting and presented by Mr. Fred Schaedel of Alpha Process Systems.
Type III Anodize: Reducing Variation in Wear Tests
Overview:
The test utilizes the Taber Rotary Platform Abraser, a simple and seemingly indestructible instrument, having two movable arms which hold accessory weights (1000g per wheel) and abrading wheels (CS-17). A 4” x 4” flat panel with a 0.25” center hole is mounted to a platen (like an old record player turntable). The two arms are then lowered and the platen rotates for specified number of cycles. At the conclusion of the test, the panel is removed and change in weight is determined.
Identifying Sources of Variation:
“Being simple and easy to operate, calibration & maintenance of the Taber Abraser are quite often ignored.”
When it comes to maintenance or calibration on the Taber Abraser, operators usually ask ‘what could go wrong, the tables turn and the wheels rotate’. 1st Choice Consulting (formerly AnaCon Labs Inc.) thought that way until we started operating multiple machines. As a third party testing lab, clients regularly sent test panels to verify the quality of their work and expected to receive accurate, reproducible results. By chance, 1st Choice Consulting discovered considerable differences in results between their four units. A study was undertaken to identify the source of this variation, using the same operator, analytical balance, weights and abrader wheels – but different machines. To us, this result was puzzling because ‘what could be causing this problem when the machines are from the same manufacturer albeit different ages'?
After contacting Taber Industries, we obtained their Calibration Verification Kit to check:
- Longitudinal alignment of abraser arms
- Transverse alignment of abraser arms
- Wheel tracking and wear pattern
- Bearing integrity (tracking pattern compliance)
- Minimum vacuum nozzle suction force
Alignment of abrading wheels is somewhat like the alignment on automobile tires. The conditions you are concerned with include toe-in, toe-out, caster, and camber. After performing the required verification tests on each of the four Taber Abrasers, we confirmed there were differences. Each unit was returned to Taber Industries for adjustment and calibration, which enabled us to re-establish a correlation between each instrument. The Taber Abraser, even though it is both rugged and durable, is fragile with respect to arm alignment, table flatness, weight spindle alignment with arm, etc, and should be treated with care.
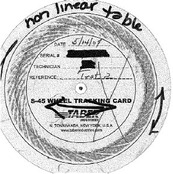
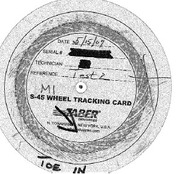
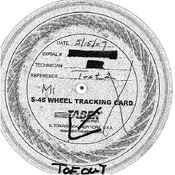
The following tracking cards give an idea of visual data obtainable from the Calibration Verification Kit.
 |
 |
 |
| Figure 1 | Figure 2 | Figure 3 |
Figure #1: indicates a table, which is not flat. Either the table is warped or motor shaft is bent. Note the difference between left and right side of the tracking card. This condition will increase the wear on one side of the test specimen as opposed to the other.
Figure #2: Indicates, abrading wheels are riding on inside half of their width. This applies more pressure to a smaller area, increasing wear rate.
Figure #3: Indicates the opposite of Figure #2, abrading wheels are riding on the outside half of their width. This again applies more pressure to a smaller area, increasing wear rate.
“A test panel coated and submitted for testing can cause considerable differences in results”.
It is not always the instrument that may be the cause of test variation. Other sources must be carefully monitored. These include improper panel preparation by the processing house and the technician’s failure to observe “small details”.
- If panel thickness is not sufficient, stressed anodic coating can cause the panel to bow, especially if coated on only one side or if both sides are not evenly coated. This can cause uneven wear during the test resulting in higher weight loss and premature coating penetration to base metal. If a specification does not specifically call out a panel thickness, a panel of not less than 0.063 inches for aluminum and 0.040 inches for steel are recommended.
- After test panels are cut to size, the center hole is usually drilled or punched. This operation may result in the formation of a small burr. Prior to testing each piece is usually cleaned and weighed. If the burr is small, the test technician may not notice it and mount the specimen to the platen. Quite often, the panel will not lay flat and uneven wear takes place, yielding high results. If the technician does notice the burr, the typical response is to remove the burr and continuing testing - not taking into account the loss of weight due to burr removal.
- Another common problem is the anodic build up in the center hole of the test specimen. The test technician usually discovers this after weighing the specimen. When the panel does not easily fit over the threaded screw on the Abraser turntable, the technician usually forces it on breaking loose the built up material. Alternatively, the technician might try to screw the panel on through the buildup. Either action act causes additional loss of metal and increases the weight loss.
And so, reproducibility and consistency of results obtained from a Taber Abraser depends on a number of parameters. In maintaining our equipment and helping others with their in-house testing, the following items have found to be critical to properly conduct the Taber wear test:
- Preparation of test piece
- Flatness of test piece
- Vacuum force (removal of abrasive residue from panel)
- Proper distance of vacuum nozzle from test panel
- Applied weight
- Type of abrading wheel (CS17, H38, etc)
- Condition of abrading wheels (improperly stored, old, worn below label, out of round, not resurfaced prior to start of test)
- Abrading wheel placement (left and right wheels placed on opposite sides)
- Weighing of specimens (even calibrated and certified analytical balances might have differences in the way they respond)
1st Choice Consulting can be reached at 951.781.9724 or by visiting their website at www.1st-choiceconsulting.com.


